Let's build a Wordle clone, Part Two
Tackling the gameplay
In part one of building a Wordle clone for fun, we got the general structure of our Svelte app in place. You can see the results of that work here.
Now we’ll tackle the meat of the app: the gameplay. The object of Wordle is to guess a five-letter word in six or fewer tries. There are six rows of five blank squares and a QWERTY keyboard at the bottom of the screen.
Each time a guess is made, correct letters are given a green background; letters that appear in the answer but are in the wrong place get a yellow background; and letters that are not part of the answer get a gray background.
Similarly, if a letter is in the answer and in the correct place, that letter on the keyboard gets a green background; a letter in the wrong place gets a yellow background; and a letter that was guessed incorrectly gets a gray background.
Main layout
I tried several approaches to the main layout of the app before finally giving in and following Wordle’s lead. The trick is that the layout has to work across devices of different viewport sizes. The keyboard stays the same size, always anchored at the bottom of the page, with the gueesses grid taking up the remaining space above, but only to a point. We limit how big it can get — no need for a giant grid. To accomplish that, we need to use the grid’s natural 5:6 aspect ratio (six rows of five-letter words) to determine a width from the available vertical space.
First, we’ll include Svelte’s bind:this directive on the guesses and keyboard elements to make them available in our sizing function. Additionally, let’s hide the guesses grid until it’s ideal width is applied.
<div class="gameboard" bind:this={gameplayEl}>
  ...
  <div class="guesses-wrapper" bind:this={guessesEl}>
    <div class="guesses" class:hidden>
      ...
    </div>
  </div>
  ...
</div>

<div class="keyboard" bind:this={keyboardEl}>
  ...
</div>
We’ll put our sizing logic into a function that gets called when the component first mounts and again every time the window is resized. Inside this function, we’ll subtract the keyboard’s height from the gameboard’s height and compute a width, limiting it to a maximum value of 350 pixels.
import { onMount } from "svelte";

let hidden = true;
let  gameplayEl, keyboardEl, guessesEl;

function resize() {
  const w = (gameplayEl.clientHeight - keyboardEl.clientHeight) * (5 / 6);
  const guessesWidth = Math.min(350, w);
  guessesEl.style.width = `${guessesWidth}px`;
  hidden = false;
}

onMount(resize);
Use the <svelte:window> directive to add resize as the handler for resize events.
<svelte:window on:resize={resize} />Building the keyboard
We’ll build our keyboard from a string containing all 26 letter of the alphabet in QUERTY order. There are also Enter and Delete keys on our keyboard, and since we’ll loop through this structure when we build our DOM, we’ll include those as lowercase characters to differentiate from the letters A to Z.
const qwerty = "QWERTYUIOPASDFGHJKLeZXCVBNMd";Loop through that to build the keyboard in the DOM. To break it up into the rows of a QWERTY keyboard layout, lte’s create an array of three slices of the whole keyboard array, the first one from Q to P (or indices 0 to 10), the second from A to L (10 to 19), and the rest in the final slice (19 to the end).
$: keyRows = [qwerty.slice(0, 10), qwerty.slice(10, 19), qwerty.slice(19)];We can now create nested loops to place the keys on the page, allowing for special treatment for the Enter and Delete keys. We’ll also add a couple of spacer divs on the second row for reasons that will become apparent when we style the whole thing.
  <div class="keyboard">
    {#each keyRows as row, r}
      <div class="key-row">
        {#if r == 1}
          <div class="spacer" />
        {/if}
        {#each row as key, k}
          {#if key == E}
          <button class="key enter">Ent</button>
          {:else if key == "d"}
          <button class="key delete">Del</button>
          {:else}
          <button class="key">{key}</button>
          {/if}
        {/each}
        {#if r == 1}
          <div class="spacer" />
        {/if}
      </div>
    {/each}
  </div>
Styling the keyboard
The keyboard is basically a grid, so the instinct is to use display: grid to style it, but the top row is offset from the bottom two rows, and two of the keys on the bottom row are wider than the rest of the keys. So rather than grid, we’ll use flexbox on each row and a flex-grow value to make the keys fill out the width of the row. Then we’ll make our spacers half the width of the other keys to center the middle row. We’ll also apply a grow value of 1.5 on the Enter and Delete keys.
.key-row {
  display: flex;
}
.key-row button {
  flex-grow: 1;
  height: 58px;
  margin-right: 6px;
  background-color: lightgray;
  border: none;
  border-radius: 4px;
  font-size: 1.15rem;
  font-weight: 700;
}
.key-row button:last-of-type {
  margin-right: 0;
}
.spacer {
  flex-grow: .5;
}
.enter,
.delete {
  flex-grow: 1.5;
}
The guesses grid
We’ll need a data structure to track the player’s guesses. I’m thinking a simple array of strings should suffice, the one catch being that we’ll want something in place for each guess, so we’ll start with six instances of ”-----” as a placeholder string. When we loop through the letters, we’ll treat ”-” as a blank space. The variable curGuess will act as an index into guesses to indicate which element of the array to change as the player types.
const guesses = ["-----", "-----", "-----", "-----", "-----", "-----"];
let curGuess = 0;
Now it’s a matter of looping through the guesses in a pair of {#each} loops.
<div class="guesses">
  {#each guesses as guess, row}
    <div class="guess">
      {#each guess as letter, col}
        <div class="letter">
          {letter.replace("-", "")}
        </div>
      {/each}
    </div>
  {/each}
</div>
Styling the guesses grid
The guesses grid is a grid of six rows, each row being a grid of five columns. That’s all centered vertically in a flexbox wrapper. We’ll use visibility: hidden to hide the grid when it’s first mounted. Each letter in a guess will have an aspect-ratio of 1 to keep it square and employ flexbox to put the letter in the center.
  .guesses-wrapper {
    display: flex;
    flex-direction: column;
    flex: 1;
    justify-content: center;
    margin: 0 auto;
    // min-width: 300px;
  }
  .guesses {
    display: grid;
    grid-template-rows: repeat(6, 1fr);
    grid-gap: 0.4rem;
    padding: 8px;

    &.hidden {
      visibility: hidden;
    }
  }
  .guess {
    display: grid;
    grid-template-columns: repeat(5, 1fr);
    grid-gap: 0.4rem;
  }
  .letter {
    align-items: center;
    aspect-ratio: 1 / 1;
    border: 2px solid lightgray;
    display: flex;
    font-size: 1.85rem;
    font-weight: 700;
    justify-content: center;
  }
Feedback
Each time the player submits a guess, we’ll want to provide feedback as to which letters are in the answer and in the correct position, which are in the answer but in the wrong position, and which are not in the answer. We’ll do so through a different background color for letters in the both the guesses grid and the keyboard. We’ll also add a bit of feedback as letters are entered — we’ll call that the “pending” state. For that, we’ll just darken the border.
.pending {
border-color: #838383;
}
.correctposition {
border-color: indigo;
background-color: indigo;
color: white;
}
.wrongposition {
border-color: goldenrod;
background-color: goldenrod;
color: white;
}
.notfound {
border-color: gray;
background-color: gray;
color: white;
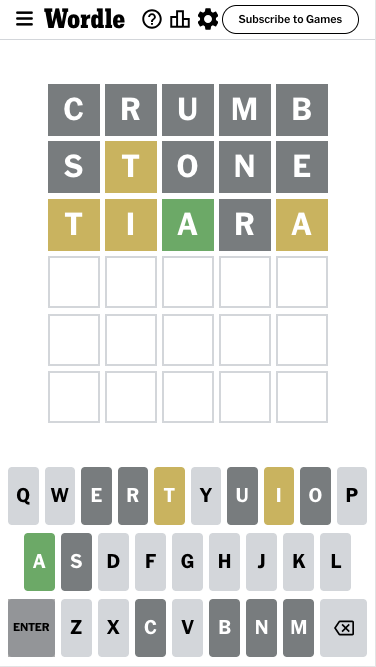
}So a guess of “STRIP” for an answer of “SPARK” would give us this:

Guesses feedback
Understanding how the feedback works is simple. Applying it is a bit more complex.
Before we start, let’s give ourselves a guess and and answer to compare and bump curGuess to 1.
const guesses = ["STRIP", "-----", "-----", "-----", "-----", "-----"];
const answer = "SPARK";
let curGuess = 1;
To apply the correct feedback class, we’ll call a function for each letter in our guess. But now, instead of class="letter" in our guesses loop, we’ll use class={guessFeedbackClass(letter, row, col)}. Here’s our first attempt at that function.
function guessFeedbackClass(letter, row, col) {
  const baseClass = "letter";

  if (row == curGuess && letter != "-") {
    return `${baseClass} pending`;
  } else if (row >= curGuess || letter == "-") {
    return baseClass;
  }

  if (answer.includes(letter)) {
    if (answer[col] == letter) {
      return `${baseClass} correctposition`;
    } else {
      return `${baseClass} wrongposition`;
    }
  }

  return `${baseClass} notfound`;
}
Here’s what’s going on in there: If the letter we’re checking is from the current guess and it’s not the placeholder, we’ll mark it as pending. If it is the placeholder, or it’s from a guess after the current guess, we’ll return no feedback, since there’s nothing to examine.
If we’re looking at a guess that has already been submitted, that is, a guess with a row index less than curGuess, we look to see if the answer includes the letter we’re checking, mark it as “correctposition” if the letter at col index in the answer matches or “wrongposition” if it doesn’t. If the anwser doesn’t include the letter, we return “notfound.”
But hang on. What if we’re checking the first letter in the guess, and the player has guessed it twice, and the second guess, in the last letter of the word, is correct? Maybe the answer is “SPINE” and the guess is “PEACE.” We’d want to know about that second E before we mark the first one as “wrongposition.”
Before we can make a determination about the current letter, we need to loop through the entire guess and the answer to figure out how many times it appears in the answer and how many times it’s in the correct position in the guess. Then we’ll change our criteia for marking a letter as “wrongposition.”
Taking our “SPINE” and “PEACE” hypothetical as an example, the letter E appears one time in the answer, is in the correct position once in the guess. When we check the first instance of E, we can’t mark it as “wrongposition” because it’s in “correctposition” later. Since the answer only has one E, this first occurrence must be marked “notfound.” We need to add a conditional before marking a letter as “wrongposition” where the number of times the letter was guessed correctly is less than the number of times it appears in the answer. Failing that — correct guess of 1 is not less than 1 appearance in the answer — we’ll fall through to “notfound.” Now change the guess to “PEACH.” Coreect guess of 0 is less than 1 appearnce in the answer, so “wrongposition” is the proper feedback.
We’re almost there. We need to address an outlier where a letter appears three times in a guess, twice in the answer, and has been guessed correctly once. Let’s change our answer to “EVADE” and our guess to “GEESE.” When we look at that first E in our guess, we see that 1 (number of times guessed correctly) is less than 2 (appearances is the answer), so we mark it “wrongposition.” But when we look at the second E in “GEESE”, the conditional again passes the test. We’re going to end up with two guesses marked “wrongposition” and one marked correct (the last E) for a letter that appears only twice in the answer.

To fix this, we need to consider how many times we’ve seen a letter that wasn’t correct as we’re looping through the guess and add that to the number of correct guesses. So for that second E, we’ll have already seen it in the wrong position once. Add that to the number of correct guesses, one, to get two. If that’s still less than the times the letter appears in the answer, we’ll mark it “wrongposition,” but it isn’t — two is not less than two — we’ll fall through to “notfound.” Now we’re cooking. We guessed three E’s for a word with two E’s in it. The last E was guessed correctly, and the first E was marked “wrongposition.” The second E gets marked “notfound” because we’ve already accounted for the other two E’s in the guess.

Let’s add this check to our guessFeedbackClass function and tweak the “wrongposition” conditional.
  let timesInAnswer = 0;
  let timesCorrect = 0;
  let timesSeenNotCorrect = 0;

  for (let i = 0; i < 5; i++) {
    if (answer[i] == letter) timesInAnswer += 1;
    if (guesses[row][i] == letter) {
      if (answer[i] == guesses[row][i]) {
        timesCorrect += 1;
      } else if (i < col) {
        timesSeenNotCorrect += 1
      }
    }
  }

  if (answer.includes(letter)) {
    if (answer[col] == letter) {
      return `${baseClass} correctposition`;
    } else if ((timesSeenNotCorrect + timesCorrect) < timesInAnswer) {
      return `${baseClass} wrongposition`;
    }
  }
Keyboard feedback
Whew! That was exhausting. Thankfully, applying feedback to the keyboard is a bit simpler. If the player guesses a letter in the correct position in any guess, then that key gets the “correctposition” feedback, regardless of whether the last guess had it in the correct position. Similarly, if the player guessed a letter that’s in the answer but guessed it in the incorrect position, it gets the “wrongposition” color until another guess has it in the correct position. Guesses that aren’t in the answer get the “notfound” feedback, obviously.
We’ll again use a function to set the class name, this time replacing class="key" with class={keyFeedbackClass(key)}.
    function keyFeedbackClass(key) {
    const baseClass = "key";

    let correctPosition = false;
    let wrongPosition = false;
    let notFound = false;

    // loop through ALL guesses, until first "-"
    for (let row in guesses) {
      const guess = guesses[row];

      // skip current guess and remaining placeholders in guesses array
      if (row >= curGuess || guess[0] == "-") break;

      for (let col in guess) {
        const letter = guess[col];

        // if this isn't the key we're checking or it's "-", continue
        if (letter != key || letter == "-") continue;

        if (answer.includes(letter)) {
          // if we set correctPosition to true in a previous iteration,
          // keep it true, otherwise compare letters in answer and guess
          correctPosition = correctPosition || answer[col] == guess[col];
          wrongPosition = !correctPosition;
        } else if (guess.includes(letter)) {
          notFound = true;
        }
      }
    }

    if (correctPosition) {
      return `${baseClass} correctposition`;
    } else if (wrongPosition) {
      return `${baseClass} wrongposition`;
    } else if (notFound) {
      return `${baseClass} notfound`;
    }

    return baseClass;
  }
Keybaord feedback

Making a guess
This is all well and good, but we’re lacking a major part of the game: input. We’ll want some way of typing or tapping our guesses into existence. For this, we’ll listen for pointerup events on our keyboard buttons (this will account for mouse clicks and touchscreen taps) and a keyup listener on the window to capture input from physical keyboards. We’ll handle these events with a function named handleKeyInput.
<svelte:window on:keyup={({ key }) => handleKeyInput(key)} />

...

{#each row as key, k}
  {#if key == "d"}
    <button class="key delete" on:pointerup={() => handleKeyInput("DELETE")}
      >Del</button
    >
  {:else if key == "e"}
    <button class="key enter" on:pointerup={() => handleKeyInput("ENTER")}
      >Ent</button
    >
  {:else}
    <button
      class={keyFeedbackClass(key)}
      on:pointerup={() => handleKeyInput(key)}>{key}</button
    >
  {/if}
{/each}
Our event handler function takes the keyboard character and adds or deletes it from the current guess, taking care to pad out the full five characters with the dash placeholder. If the guess length is equal to 5, we ignore input of keys A to Z, and it the length is 0, we ignore input from the DELETE key. If the length is 5 and the key is ENTER, we check the result and increment curGuess to prepare for the next guess. In part three of this project, we’ll end gameplay if the answer and guess match, provide suitable feedback and show the Statistics component. For now, we’ll celebrate with a simple “Hurray!”
function handleKeyInput(key) {
  let guess = guesses[curGuess].replace(/-/g, "");

  key = key.toUpperCase();

  switch (key) {
    case "ENTER":
      if (guess.length == 5) {
        if (guess == answer) {
          alert("Hurray! You got it!");
        }
        curGuess += 1;
      }
      break;
    case "DELETE":
    case "BACKSPACE":
      if (guess.length > 0) {
        guess = guess.slice(0, guess.length - 1);
        guesses[curGuess] = guess + "-----".slice(guess.length);
      }
      break;
    default:
      if (/[A-Z]/.test(key) && key.length == 1 && guess.length < 5) {
        guess += key;
        guesses[curGuess] = guess + "-----".slice(guess.length);
      }
      break;
  }
}
Hang on a moment. When we make a guess, hit the Enter key, nothing happens. Where’s all that feedback we put in? Well, let’s look at our Enter key handler. It’s incrementing curGuess, but it’s not calling our feedback functions. Actually, the guess will update, but only after we start typing the next answer. The problem is we don’t have anything reactive in the DOM to trigger those functions. Luckily, Svelte makes the solution simple. Svelte has a special {#key expression} block that destroys and recreates its contents whenever the expression changes. We want our guesses and keyboard to update when curGuess changes, so we’ll wrap the top-level {#each} blocks on our “guesses” and “keyboard” divs with {#key curGuess} … {/key}. The feedback now updates when we hit Enter.
Conclusion
We covered a lot of ground here. We have a more or less playable Wordle clone. (Download the zipped project here.) The most obvious thing we’re missing is a means of setting a new answer everyday. We’ll tackle that in in Part Three, along with:
- Saving and reloading a player’s progress for the day’s puzzle.
- Blocking input once a game has been completed.
- Keeping track of a player’s performance and streaks in the Statistics component.
- Filling and styling the HowToPlay component.
- Fleshing out the Welcome component and adjusting the prompt it displays.
Until then, happy coding.